Collaborative Work
In this tutorial, we will see how we can set a collaborative workflow with Odyssey thanks to version control. Version control is method that enables several artists and technicians to work all together on a same project, either on site or remotely.
Note
The following lesson is for advanced users. Many steps will redirect you to other links and videos to help you as much as possible, but keep in mind it requires advanced knowledge in the field of IT.
How does Version Control work?
Basically, Odyssey can emulate a workflow that is very common in IT development. In IT development, a master project is hosted on a server and is made of several tiny text files containing source codes.
Each developer downloads a copy of the entire project and its files to edit some of them locally. Usually, everything is done in a way that developers will not interfere in each other’s work by editing the same files at the same time.
Once enough changes are made, the newest version of a file is commited, which means it is validated as a log. Then, all commits can be “pushed” to the master project available on the server, which will write a new version of those very same files.
When necessary, other developers can “pull” the newest version of the commited files to see how it affects their own work.
If a mistake was made, it is possible to reverse the change and retrieve an older version of a file.
All this process is “Version Control”.
Unreal Engine is a software initially designed for games developers, which is why it is compatible with version control systems. And since Odyssey is made from Unreal Engine, it inherits this great ability for the production of animated movies.
Unreal Engine and Odyssey share the same project architecture. In both cases, a project is made, at least, of a 2 main elements:
The .uproject file that lists some information like the version of the engine in use and the plugins that have been enabled.

—
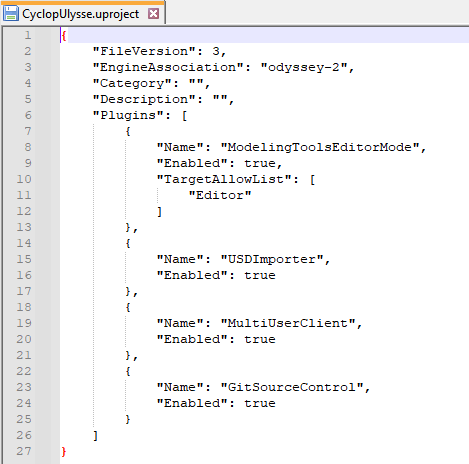
2. the Content folder, which is your assets library that contains anything you need in your project: rigged characters, static props, materials, textures, sounds, animations, drawings, levels, brushes, widgets, sequences, and stuff.
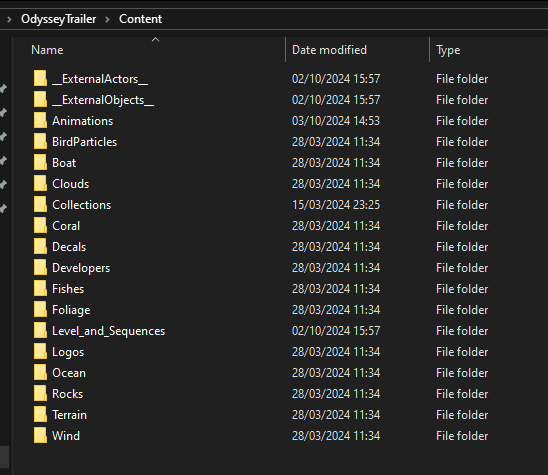
Above: The Content folder on Windows
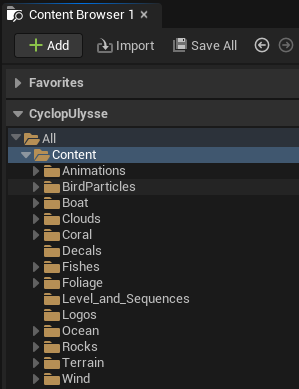
Above: The Content Browser in Odyssey
So, instead of working on source code files with developers, you will be working with various assets types with artists. The rest remains the same: a 2d animator can work on a 2d animation while a background artist assembles a map made of various 3d assets painted by a texturing artist. When they commit and push their changes on the server, anyone can pull the newest version of the following files and enjoy the result.
This collaborative workflow eases iterations and prevents errors that are usually detected in post-production.
Put in place your host server
There are several solutions to host your project:
SVN
Perforce
Git
In this tutorial, we will be using Git, an open-source program for version control, dedicated to non-linear workflows. More precisely, we will use the platform GitHub, which is a web interface based on Git. This is the platform we use at Praxinos to develop Odyssey.
Create an account
First of all, let’s create your account on the platform GitHub. If necessary, you will find a well explained video tutorial here: https://www.youtube.com/watch?v=Gn3w1UvTx0A
Note
Depending on your profile, especially if you want to create private repositories or if you need more than 500mb of storage, you might need to sign up for a paying plan.
If you plan to work with teammates, you might also need to create roles and give specific rights to the other members of your team. Learn more about roles here.
You might need to put in place SSH protocols to ease the login process. If you want to know more about it, please read this documentation.
Once your account has been created, please log in.
Create a Repository
Once logged in your account, we will create a “Repository”. A repository is basically a folder that will contain all your projects, assets and configurations. This repository will be stored online, but you will be able to get a local copy on your computer.
Follow the instructions here to create a repository
Congratulations, your repository with your future project has been created.
Install Git
Git must be installed on your computer. This shell enables the use of command lines to control the iteration of the project.
You can download Git from the official website here: https://git-scm.com/
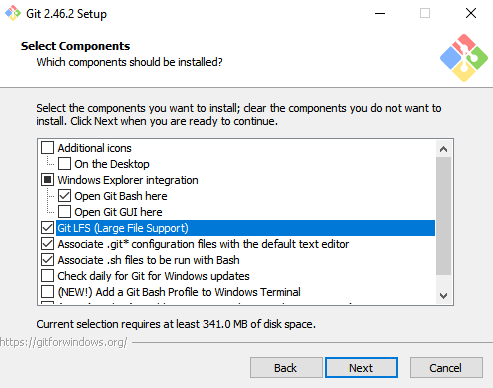
During the installation process, make sure you tick “Git LFS (Large File Support)” and “Git Bash”.
Note
Remember where Git is installed, as it might be necessary later.
Github Desktop
Developers who are familiar with Git knows how to use command lines to manage various actions on the repository (pull, push, fetch, merge, etc). Your teammates might not not feel comfortable with command lines, so we will download and install another application that offers a user interface to replace these command lines: Github Desktop.
Github Desktop is an application that allows you to pull and push commits done in the repository without using command lines. To install GitHub Desktop, please click here: https://desktop.github.com/
If you need help to download and install GitHub Desktop, you can follow this video tutorial: https://www.youtube.com/watch?v=3JdDAJ2YPeU
Once downloaded and installed, log in your account on GitHub Desktop.
Once logged, go back to the website GitHub and open your repository. Then click on the button “<> Code” and open it with GitHub Desktop.
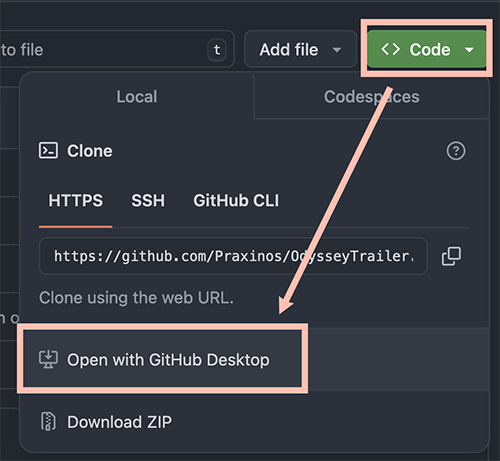
More information can be found here.
The repository is now cloned and available locally on your computer.
Put in place & configure your project
Odyssey project
First of all, it will be necessary to create or use an existing Odyssey project.
If you need to create a project, open Odyssey and create a new projet in the directory of your local repository.
If you want to use an exsiting project, copy or move the project (including uproject, content folder and -if necessary- Config folder) in the directory of your local repository.
Configure “.gitignore”
This tiny file is a necessity to prevent the upload of unwanted files and folders in the repository. For instance, files that are automatically created by MacOS (.DS_Store) or folders like DerivedDataCache that is used to store the data from the local cache.
In the root directory of the repository, create a Text Document and rename it
.gitignore(the dot at the beginning is mandatory).
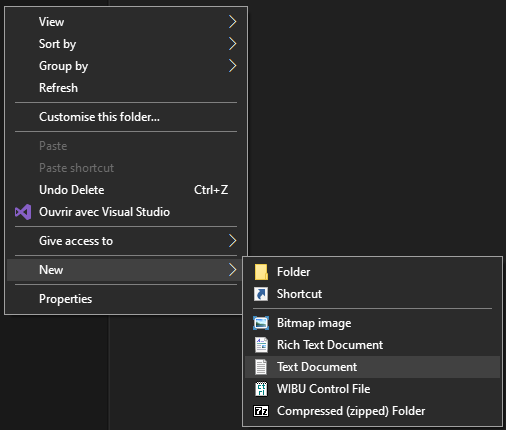
Confirm the fact you are changing the format of the file.
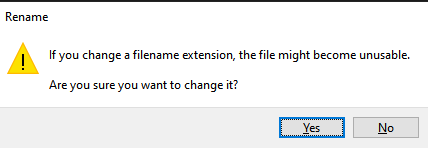
Open the file with the software Notepad++, or any other similar application, and copy paste the following lines:
Binaries
DerivedDataCache
Intermediate
Saved
Plugins
Config
.vscode
.vs
*.VC.db
*.opensdf
*.opendb
*.sdf
*.sln
*.suo
*.xcodeproj
*.xcworkspace
*.DS_Store
*.gitattributes
Save .gitignore
Push your first commit
Open GitHub Desktop to commit your first changes.

Type here the title of the commit. It is usually a one-line summary of the changes done. If you need to provide more details, use the description below.
Once done, you can confirm the commit, then push it.

This action will send all the new and modified assets on the GitHub repository. Assets that have not been changed will not be pushed to prevent unnecessary uploads.
Note
A commit is like a log in a journal to be added as soon as a task is achieved.
A push is like a parcel containing all the commits.
Commits that are not pushed remain on the local drive. Pushing the commits means you ship all the changes to the online repository. In order to get these updates on the project, your teammates will have to pull them from the online repository.
Preventing changes in project Config
If you want to prevent your teammates to bring changes in the configuration of the project, now it is time to update the file .gitignore
by adding the folder Config in the list.
Commit the change and push it on the Github repository to make sure no one will be able to overwrite the default Config files of the project.
Note
If you need later to update the Config, you will have to remove temporarily Config from .gitignore.
Managing project iterations
Branches
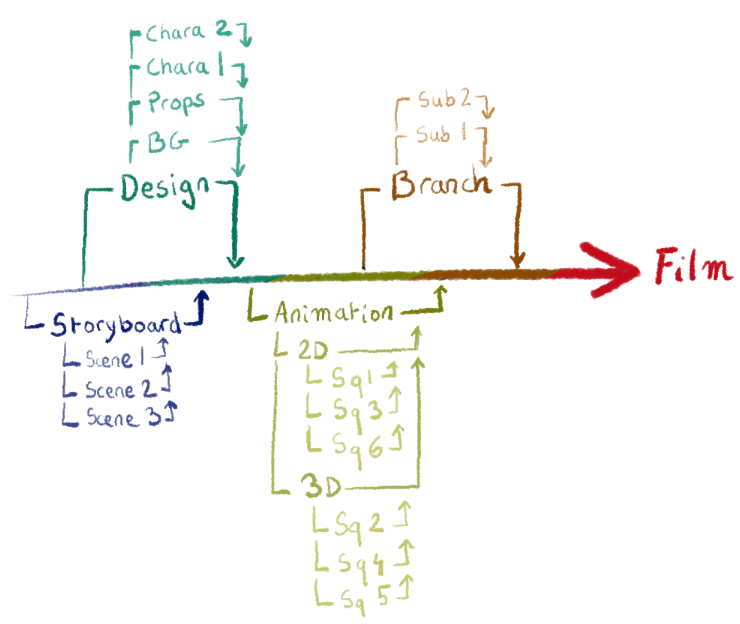
Branches are very common in IT development. Imagine a branch like a room in which you can work alone or with teammates without being disturbed by other co-workers. The purpose of branches is to let you proceed with significant changes (example: animating a character, doing a whole storyboard) for a certain moment, before submitting the changes to the person in charge of validation.
If the changes are validated, additional branches can then be merged with the main branch to update the project for everyone.
Note
Managing branches might not be an intuitive process for the artists in your team. We advise you to create the branches depending on the tasks to be done, then assign the branches to your co-workers. You will find all the details to create and manage branches here.
Pull changes
From time to time, your teammates will have to scan the repository on Github to check for any new changes.
To do so, open GitHub Desktop and click on “Fetch”.

If there is nothing new, there is nothing else to do, you can open your project and keep working.
If new commits are detected, you will be offered the possibility to pull the changes and have an updated version of some assets from the project.

Assets that have not been changed will not be pulled to prevent unnecessary downloads.
Follow History
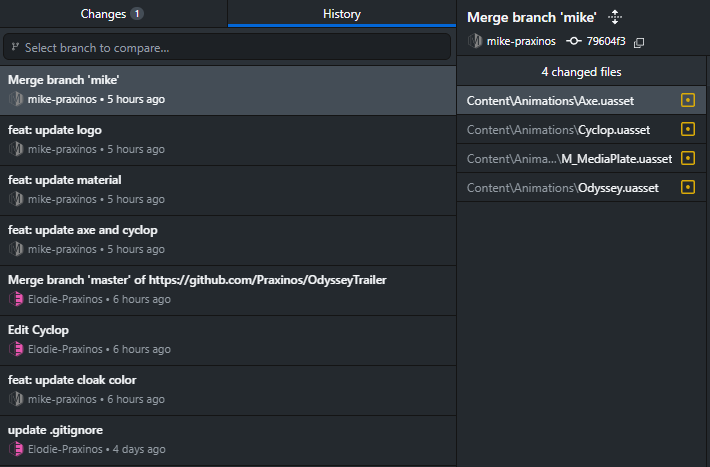
In the tab “History”, you can see the different commits pushed by teammates and the branches that got merged.
Managing conflicts
Even though everything has to be done to prevent conflicts, error is human and you might encounter this situation with this warning message:
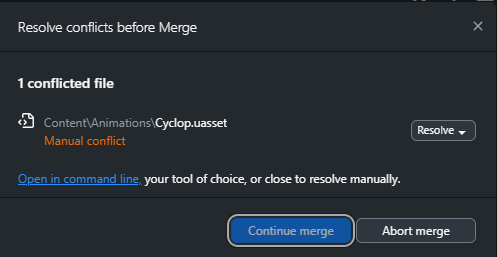
This means someone commited and pushed a new version of the asset you were currently editing. In that situation, there are only two solutions to resolve the conflict:
Use the modified file from [name-of-the-branch], which means you will use the local version of the asset (the one from your computer), and you will erase the version made by your co-worker.
Use the modified file from origin/[name-of-the-branch], which means you will use the version pushed by your co-worker, erasing your own version.
Whatever your decision is, you will have then to click on Continue merge to move forward.
Warning
Such conflicts must be exceptional. If that situation occurs too many times, you must reconsider rights of the team and methodology.
Preventing conflicts with Levels
Assets that are more likely to be concerned by conflicts issues are Levels. To prevent this, 2 things can be put in place:
enable “Use External Actors” in “Edit” ▸ “World Settings” for each Levels.
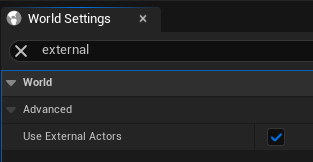
Thanks to this feature, several people will be allowed to work on the same Level to modify the position of different Actors. Instead of having 1 asset Level considered as unsaved, it will be the invidual position of each assets that will be stored and updated.

Above: 2 Levels noted as modified, which will prevent other teammates to work on these Levels and might create conflicts.
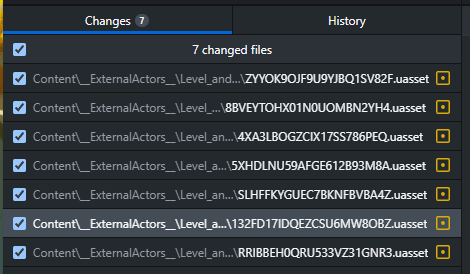
Above: Several Actors modified in different Levels, which will ease collaborative work on same Levels.
Note
If you enable External Actors after using Sub-Levels, you will have to delete them from the Levels panel and add them again to refresh their display.
Revert changes
You can use Github Desktop to revert the changes done to the project. To do so, go to the History tab, make a right click on the commit of your choice and choose “Revert changes in commit”.
Note
Do not be surprised, for reverting a commit… will create a commit.
Revision Control
Revision Control is an additional feature to be activated in your project. When using Github Dekstop, Revision Control is not a mandatory step, since most of the actions can be done through Github Desktop, except push and pull, which must still be done through that application.
However, Revision Control offers a few additional interesting features, so it might be interesting to enable it.
Enable Git support
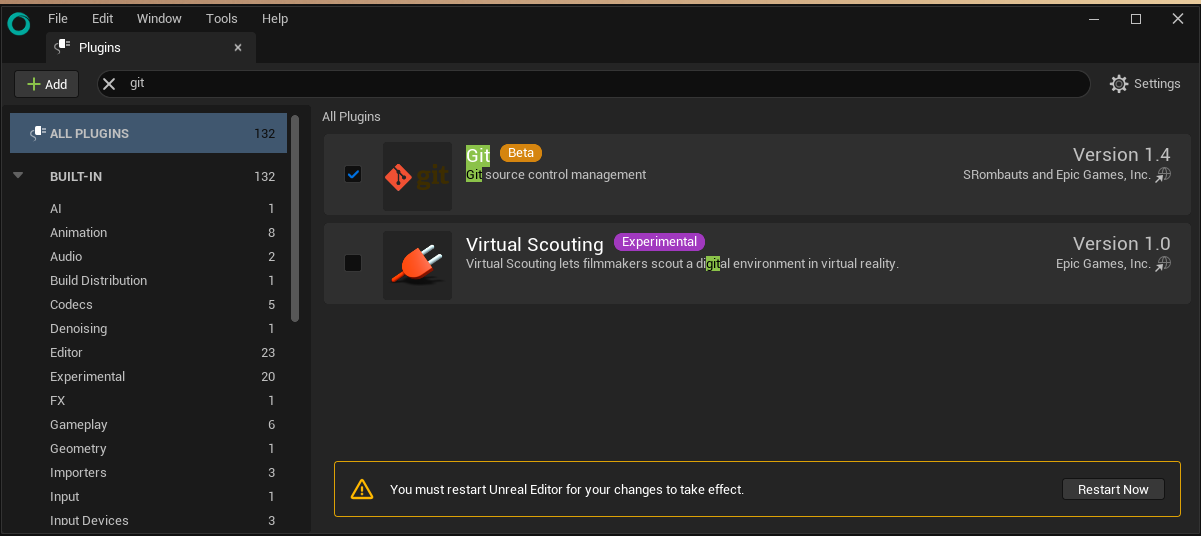
Go to “Edit ▸ Plugins” and type “Git” in the Search field. Then, enable the add-on Git and restart the project.
Enable Revision Control
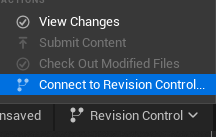
At the bottom right corner, click on “Revision Control ▸ Connect to Revision Control”” it.
Select “Git”.
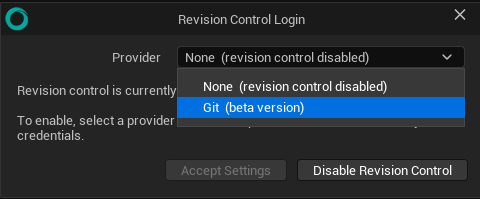
After choosing Git, new options will be displayed. Give the path to the program Git. By default, it should be C:\Program File\Git\bin\git.exe.
Accept the settings to connect automatically to your account (SSH authentification can ease the process).
Advantages of Revision Control
Enabling Revision Control offers additional features that can be useful:
You can view all the changes done since the last commit directly from the project (bottom-right corner ▸ Revision Control ▸ V*iew changes*).

You can commit changes directly from the project (bottom-right corner ▸ Revision Contro*l ▸ *Submit content). Push and pull shall be done from GitHub Desktop though.
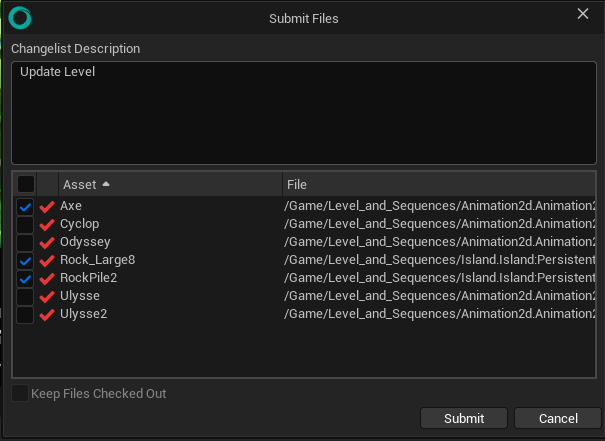
- Additional icons will be displayed in the Content Browser to inform you of the status of the asset.
Yellow Question Mark is for newly created assets that are not saved yet.
Green Plus is for newly created assets that have been saved.
Red Tick is for existing assets that were modified and saved
If you right click on an asset to display a contextual menu, then go to Revision Control ▸ Revert, you can revert changes made to an asset and get the version from the last commit.
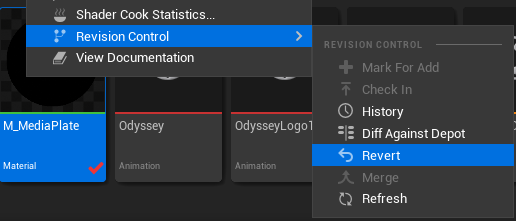
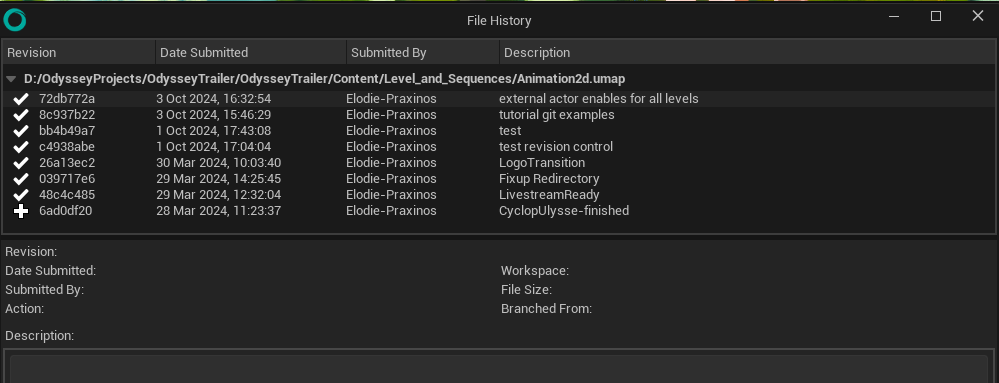
If you right click on an asset to display a contextual menu, then go to Revision Control ▸ History, you can display all the changes brought to an asset.
When working with Blueprints, you can display a “Diff Against Depot”, which will show you the difference between the previous commited version and the current version (that is not commited yet).
We hope this guide will help you to configure your collaborative workflow!
Note
If you need any help to set up your collaborative workflow, please contact Praxinos for additional tech support services.