Create Assets & Open a 2d Editor
Open the Content Drawer
By default, if you have chosen to create a project “2D drawing & Texturing” or “2D animation”, you will directly start with a 2D editor. Creating a new asset requires you to access the Content Drawer of Odyssey. To do so, click at the bottom left button or use the shortcut Ctrl+Space.

To know more about the Content Drawer, please read this lesson.
Create a Texture 2D
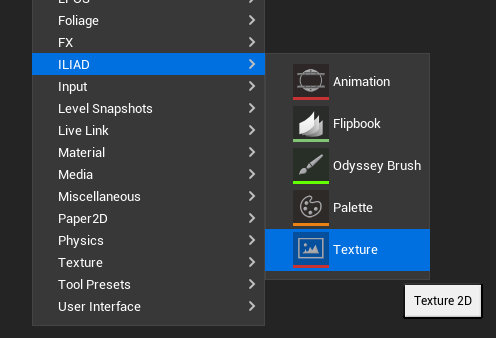
Make a right-click on the Content Drawer on the empty area to display a pop-up menu. Then, go to the sub-menu “ILIAD” and click on “Texture”. A window will ask you then to enter the Texture 2D settings.
Icon |
Description |
|---|---|
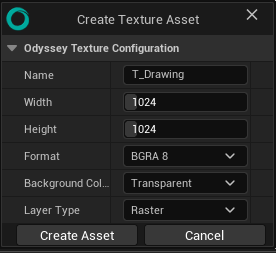
Name |
Enter the name of your Texture. According to the naming convention, they should be like “T_TextureAssetName” |
Width | Height |
Choose the size of your texture in pixels. If the Texture will be used with a Material to modify a 3D object, we strongly advise you to pick up a size that is a multiple of 2 (i.e. 128 x 128, 256 x 512, 2048 x 1024, etc). |
Format |
This dropdown menu will let you choose the image format : Grey 8 (only grey value in 8 bit), BGRA 8 (Blue Green Red Alpha in 8 bit), BGRE 8 (Blue Green Red Exponent in 8 bit), RGBA 16 (Red Green Blue Alpha in 16 bit) and RGBA 16 F (Red Green Blue Alpha in 16 bit float). If you don’t know what Format to use, keep the defaul value. |
Background Color |
Choose the color of the background. It can be transparent, white or purple (which is useful to paint Normals Maps). |
Layer Type |
Choose between a Raster Layer or a Vector Layer by default. |
Then click on “Create Asset” to confirm your choice.
Warning
You cannot change the size of a Texture afterward! Choose wisely!
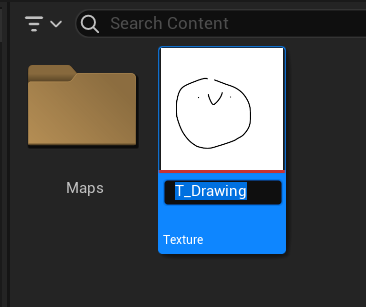
If you need to rename your Texture, hold the click on the Texture’s default name to modify it. Then, hit Enter on your keyboard to confirm your choice.
Create a Flipbook
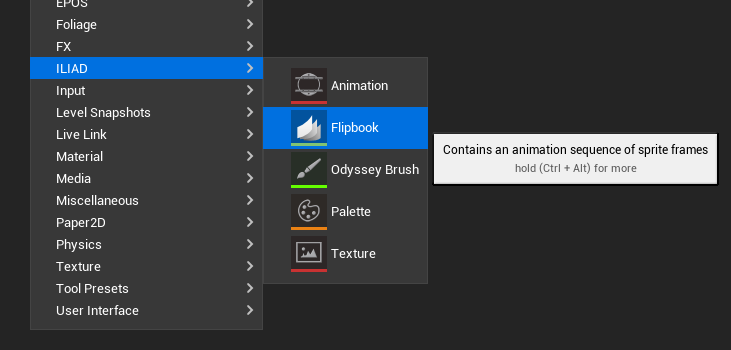
Make a right-click on the Content Drawer on the empty area to display a pop-up menu. Then, go to the sub-menu “ILIAD” and click on “Flipbook”.
Create an Animation
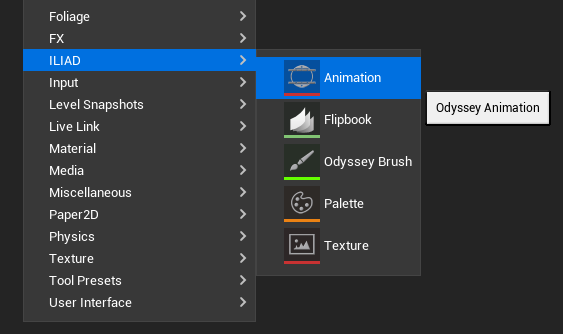
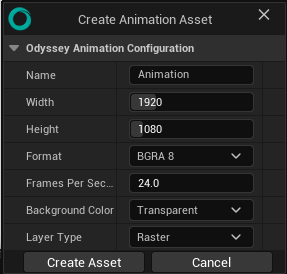
Make a right-click on the Content Drawer on the empty area to display a pop-up menu. Then, go to the sub-menu “ILIAD” and click on “Animation”. A window will ask you then to enter the Animation settings.
Icon |
Description |
|---|---|
Name |
Enter the name of your Animation. According to the naming convention, they should be like “An_AnimationAssetName” |
Width | Height |
Choose the size of your texture in pixels. If the Animation will be used with a Material to modify a 3D object, we strongly advise you to make sure it fits the expectation of the 3D object. |
Format |
This dropdown menu will let you choose the image format : BGRA8 (8 Bit) and RGBA F (16 bit) If you don’t know what Format to use, keep the defaul value. |
Frames Per Second |
Choose here the framerate of your animation. |
Background Color |
Choose the color of the background. It can be transparent, white or purple (which is useful to paint animated Normals Maps). |
Layer Type |
Choose between a Raster Layer or a Vector Layer by default. |
Warning
You cannot change the size of an Animation afterward! Choose wisely!
If you need to rename your Animation, hold the click on the Animation’s default name to modify it. Then, hit Enter on your keyboard to confirm your choice.
Open an Asset
To open a Texture 2D, a Flipbook or an Animation in their corresponding editors, just double click on the asset.